

Creating and configuring a Bot in Teams
In this guide, I will detail all the possibilities to interact automatically with Teams to communicate with playbooks within Mindflow. This guide is intended to make each step as clear as possible.
- Prerequisites:
- Have an Azure account
- User able to provision, deploy, and publish the Bot to Azure and Teams.
- A Teams license
- A Teams administrator
1. Create a bot in Teams
Section titled “1. Create a bot in Teams”1.1 Configuration
Section titled “1.1 Configuration”For the configuration of your bot in Teams, the simplest way is to follow the guide below step by step. These guides detail the process of creating a bot, from initial setup to going live.
A. Files description
Section titled “A. Files description”This guide details the step-by-step process of creating a Microsoft Teams bot integrated with Mindflow, starting from the downloadable package available via:
https://drive.google.com/drive/folders/1u5iziZfqmvRTuczwUCu89ppLyd_hTy3J?usp=drive_link
Below is a breakdown of the key files in the repository and how they should be modified.
-
teamsBot.js
This is the core logic of your Teams bot.
- **Example file** that adds a function triggering the playbook referenced by the webhook URL whenever a message sent to the bot contains "automation". The playbook receives the activity along with the message content.
    ```jsx    const { TeamsActivityHandler, TurnContext } = require("botbuilder");
    class TeamsBot extends TeamsActivityHandler {      constructor() {        super();
        this.onMessage(async (context, next) => {                // Remove mention text and check if the message contains relevant commands                const activity = TurnContext.removeMentionText(context.activity);
                if (activity && context.activity.text) {                    const text = context.activity.text.trim().toLowerCase();
                    // Handle different commands with clear conditions                    if (/automation/.test(text)) {            await this.launchMindflowAutomation(context)          }          // By calling next() you ensure that the next BotHandler is run.          await next();        });
        this.onMembersAdded(async (context, next) => {          const membersAdded = context.activity.membersAdded;          for (let cnt = 0; cnt < membersAdded.length; cnt++) {            if (membersAdded[cnt].id) {              await context.sendActivity(                `Hi! I am a Teams bot that will automatically launch an automation.`              );              break;            }          }          await next();        });      }
      async launchMindflowAutomation(context) {        const activity = context.activity        try {          const response = await fetch("https://webhook-`<URL-Synchronous>`.mindflow.io/", {            method: "POST",            body: JSON.stringify({              activity : {activity},            }),            headers: {              "Content-type": "application/json; charset=UTF-8"            }          });          const headers = response.headers;          const responseText = headers.get('response-text');
          await context.sendActivity(`Response: ${responseText}`);        } catch (error) {          console.error("Error retrieving data:", error);          await context.sendActivity(`Error: ${error.message}`);        }      };    }
module.exports.TeamsBot = TeamsBot; ```-
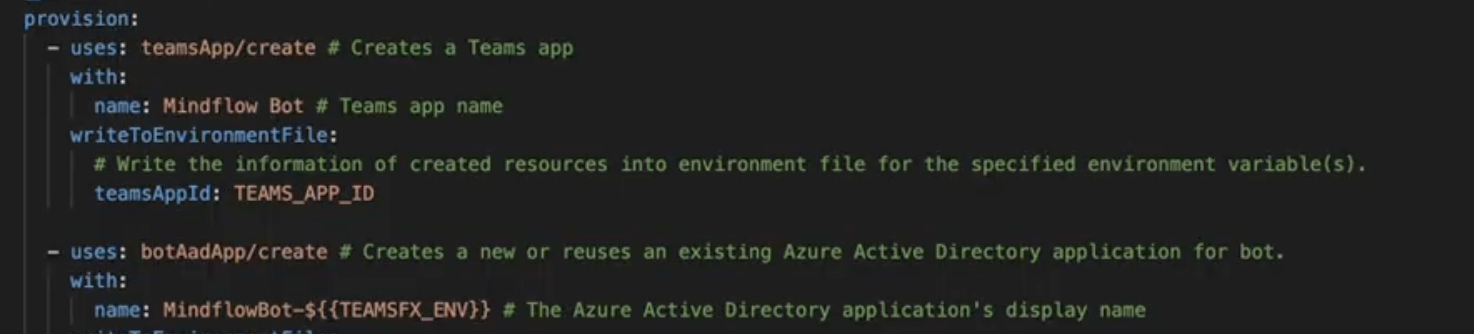
teamsapp.yml
This file defines the deployment process on Azure.
- Controls how the app is provisioned and deployed.
- Usually, only the name needs to be updated to match your bot.
-
index.js
Entry point of the Node.js application.
- Loads environment variables and the bot logic (
teamsBot.js).
- Loads environment variables and the bot logic (
- azure.parameters.json
Contains Azure deployment parameters.
- webAppSKU defines the VM type for hosting your bot:
D1→ basic, low-cost option (sufficient for small-scale bots).
- Higher SKUs available for more performance.
👉 list of all VMs available : <https://azure.microsoft.com/en-us/pricing/details/app-service/windows/>- azurebot.bicep
Azure Infrastructure-as-Code definition for your bot service.
-
msAppTenantId: your Azure AD tenant ID.

-
endpoint: the bot’s public HTTPS endpoint.
- Can also be updated directly in the Azure portal. ⚠️ Be aware that redeployments will overwrite changes unless they are updated in code.
- manifest.json
You can edit the bot’s details, including its name, description, reference links, and logo, by modifying the manifest.json file in Visual Studio Code. Simply update the relevant keys, and for logos, replace the files color.png and outline.png with your own. If your files have different names, make sure to update the icons object accordingly. Additionally, ensure that the color image is 192x192 px and the outline image is 32x32 px.
Link to the schema with all available properties: https://developer.microsoft.com/en-us/json-schemas/teams/v1.21/MicrosoftTeams.schema.json
This file defines how your bot will appear inside Teams.
- The
botsobject includes:- scopes – where the bot can be used: personal chat, group chat, or team channels.
- commandLists – pre-defined commands available to users (optional).
```jsx// For the command previously added in the teamsbot.js file, the following lines must be specified in the manifest "commandLists": [ { "scopes": [ "personal", "groupchat", "team" ], "commands": [ { "title": "Automation", "description": "Launch MSTeams: Bot framework Integration Playbook in Mindflow " }] } ]```text2. Provisioning and deployment
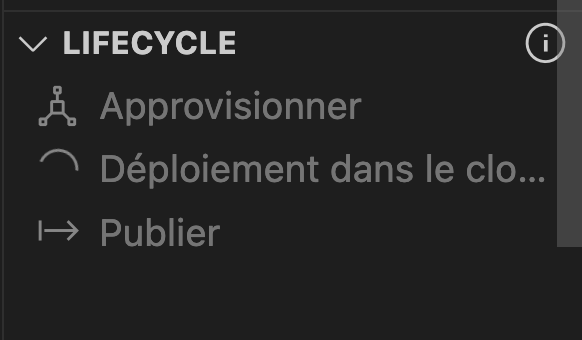
Section titled “2. Provisioning and deployment”This section covers deploying your Teams bot to Azure and connecting it to Microsoft Teams using the Microsoft 365 Agent Toolkit in Visual Studio Code.
-
Provision the application in Azure
Before provisioning the application in Azure, you need to create a resource group in Azure and attach this group to a subscription and a region.
Azure Portal > Resource Groups > Create. You can choose any region; there are typically no restrictions for this setup.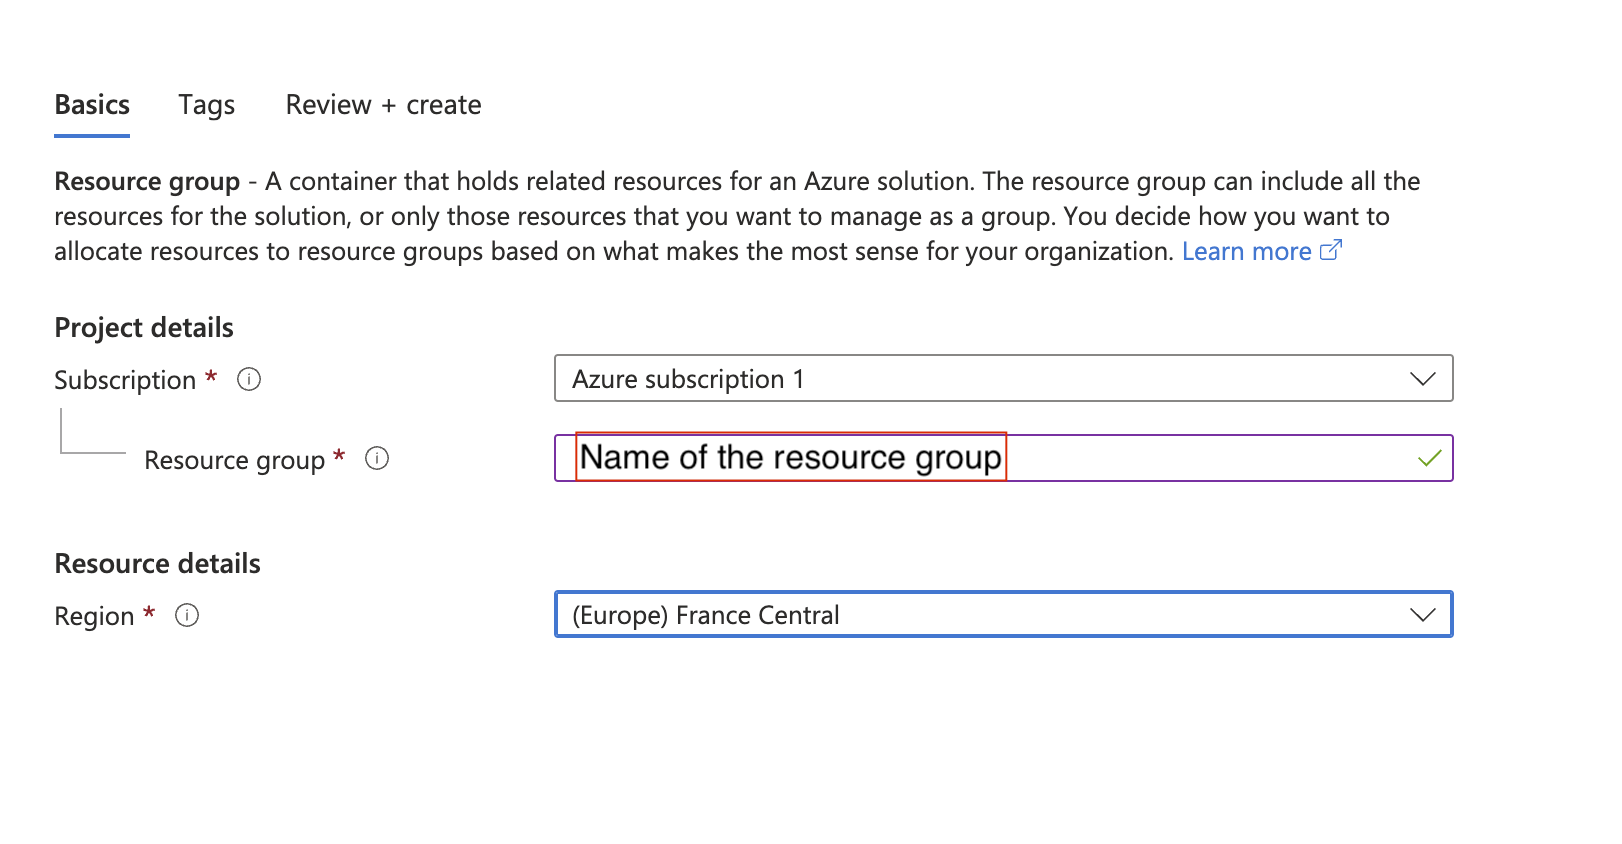
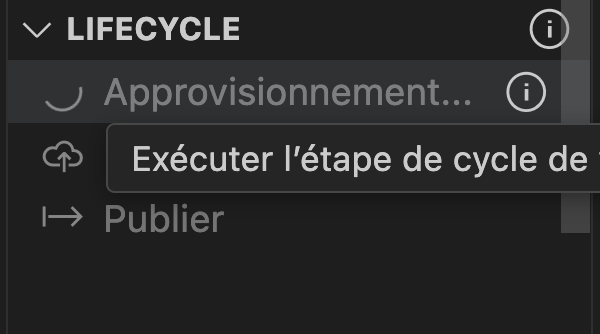
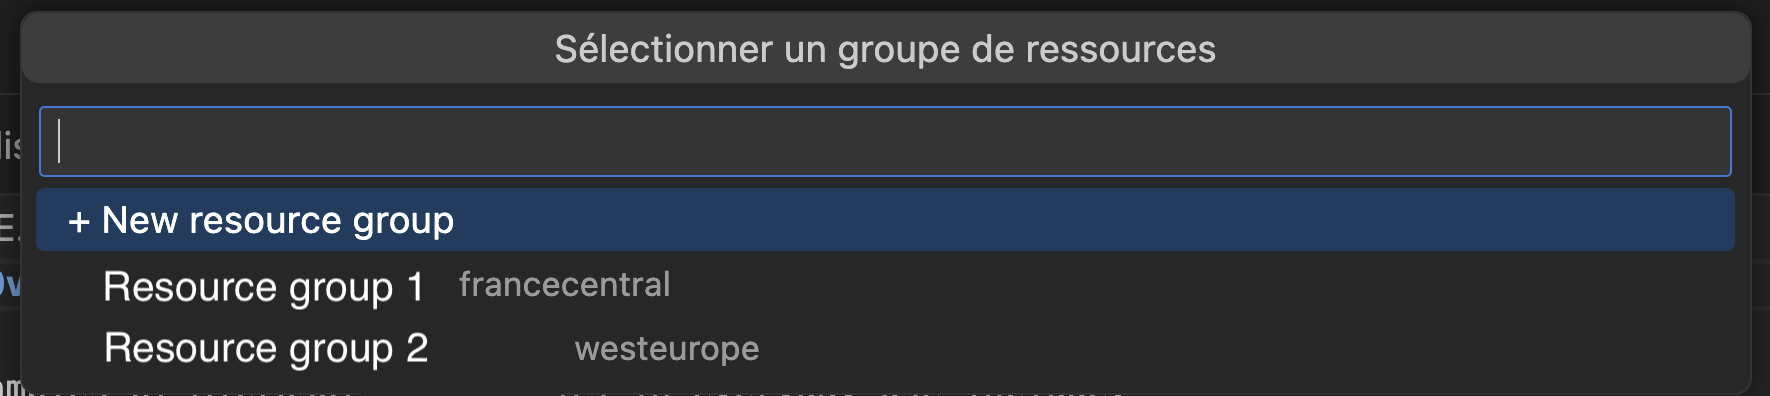
Select the right resource group created in the step before
-
then deploy
3. Configuration
Section titled “3. Configuration”This section explains the necessary configuration steps in Microsoft Teams and Azure to ensure your bot can communicate properly and use OAuth connections.
3.1. Publish the app in Teams
Section titled “3.1. Publish the app in Teams”-
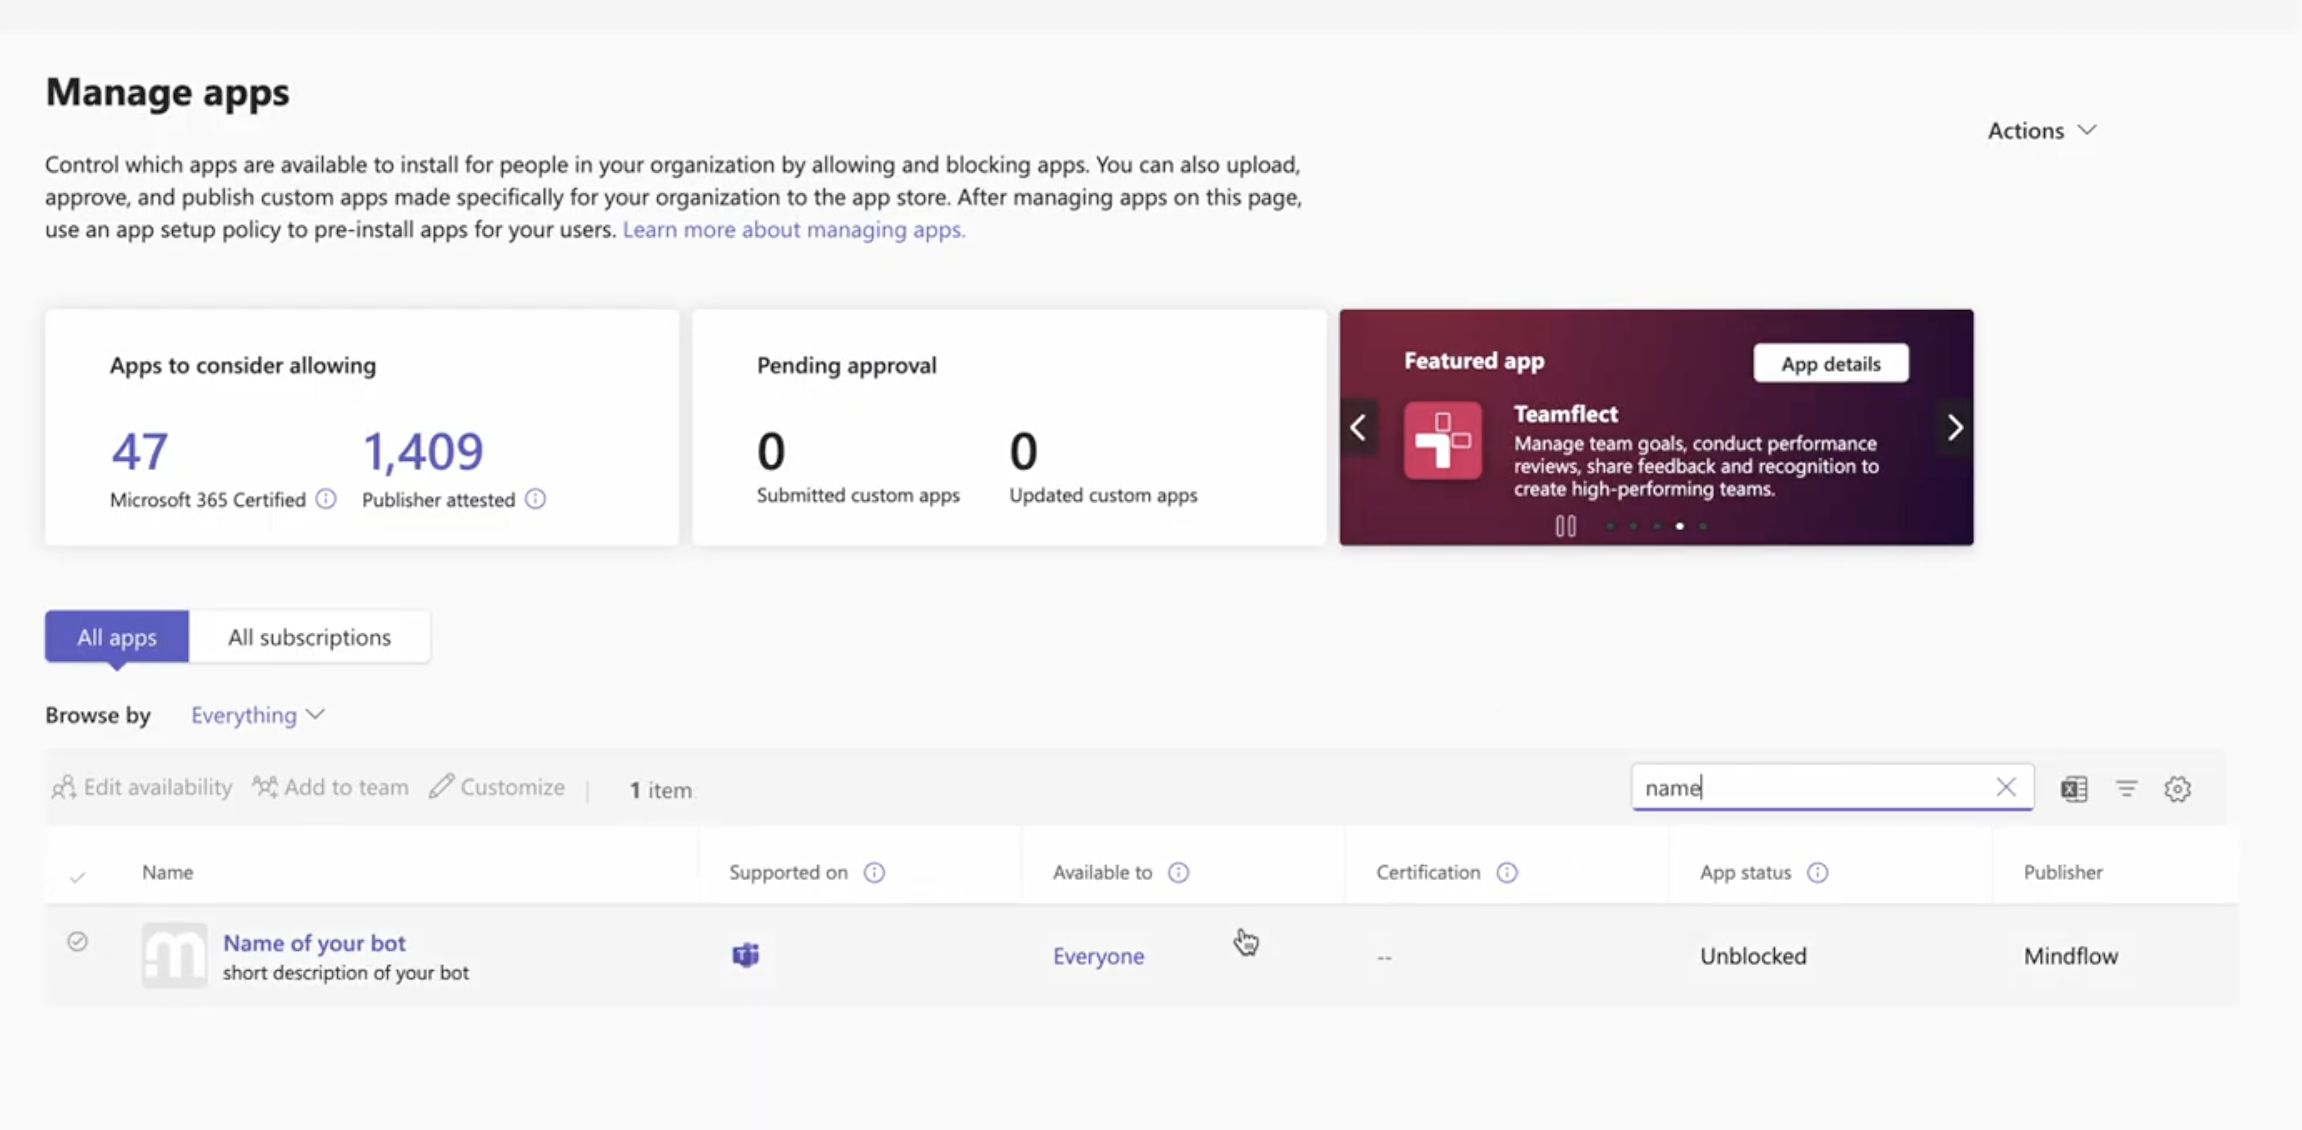
Go to the Teams admin center: admin.teams.microsoft.com/policies/manage-apps
-
Locate your app and publish it for your organization.
3.2. Configure app registration in Azure
Section titled “3.2. Configure app registration in Azure”-
Open the Azure portal: portal.azure.com → Entra ID (Azure Active Directory)
-
Select your App Registration for the bot.
-
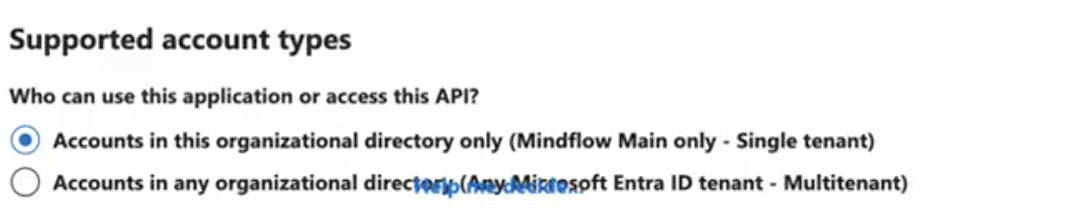
Add a Redirect URL
-
Add a Platform:
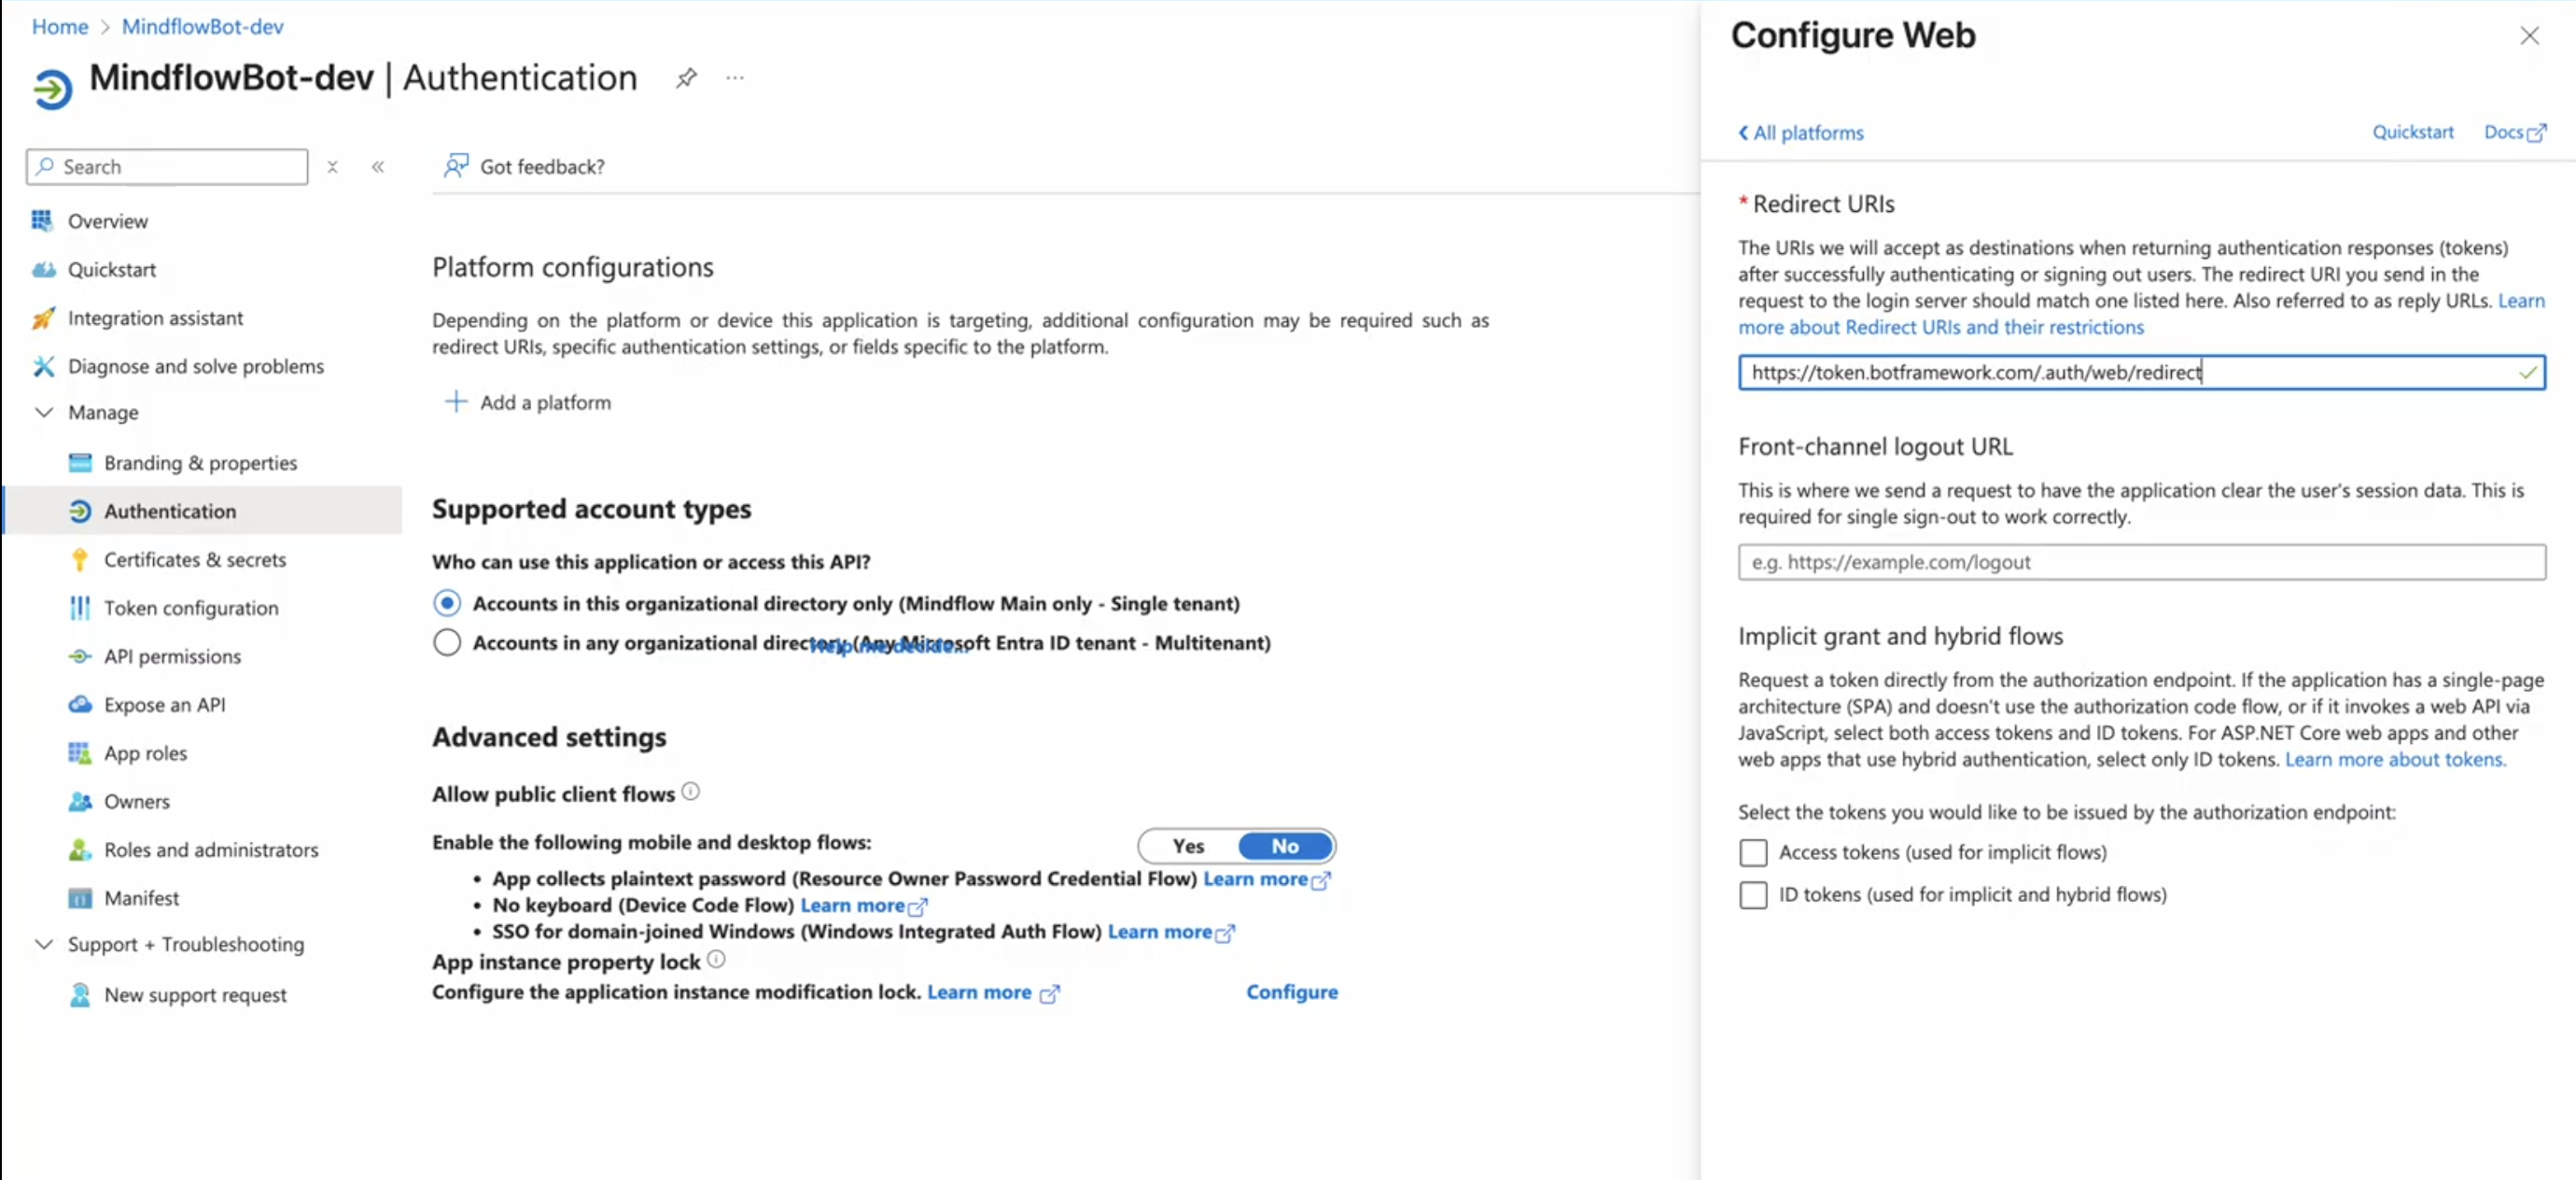
Include the following redirect URL for the Bot Framework. This redirect URL is required so the Bot Framework can securely capture the user’s authentication token from the identity provider and pass it back to the bot at runtime.
https://token.botframework.com/.auth/web/redirectThen click Save.
3.3. Create OAuth connection between app registration and Azure bot
Section titled “3.3. Create OAuth connection between app registration and Azure bot”-
Go to your Resource Group in Azure (as defined by
RESOURCE_SUFFIXinenv.devin VS Code). -
Locate your Azure Bot resource.
-
In Configuration:
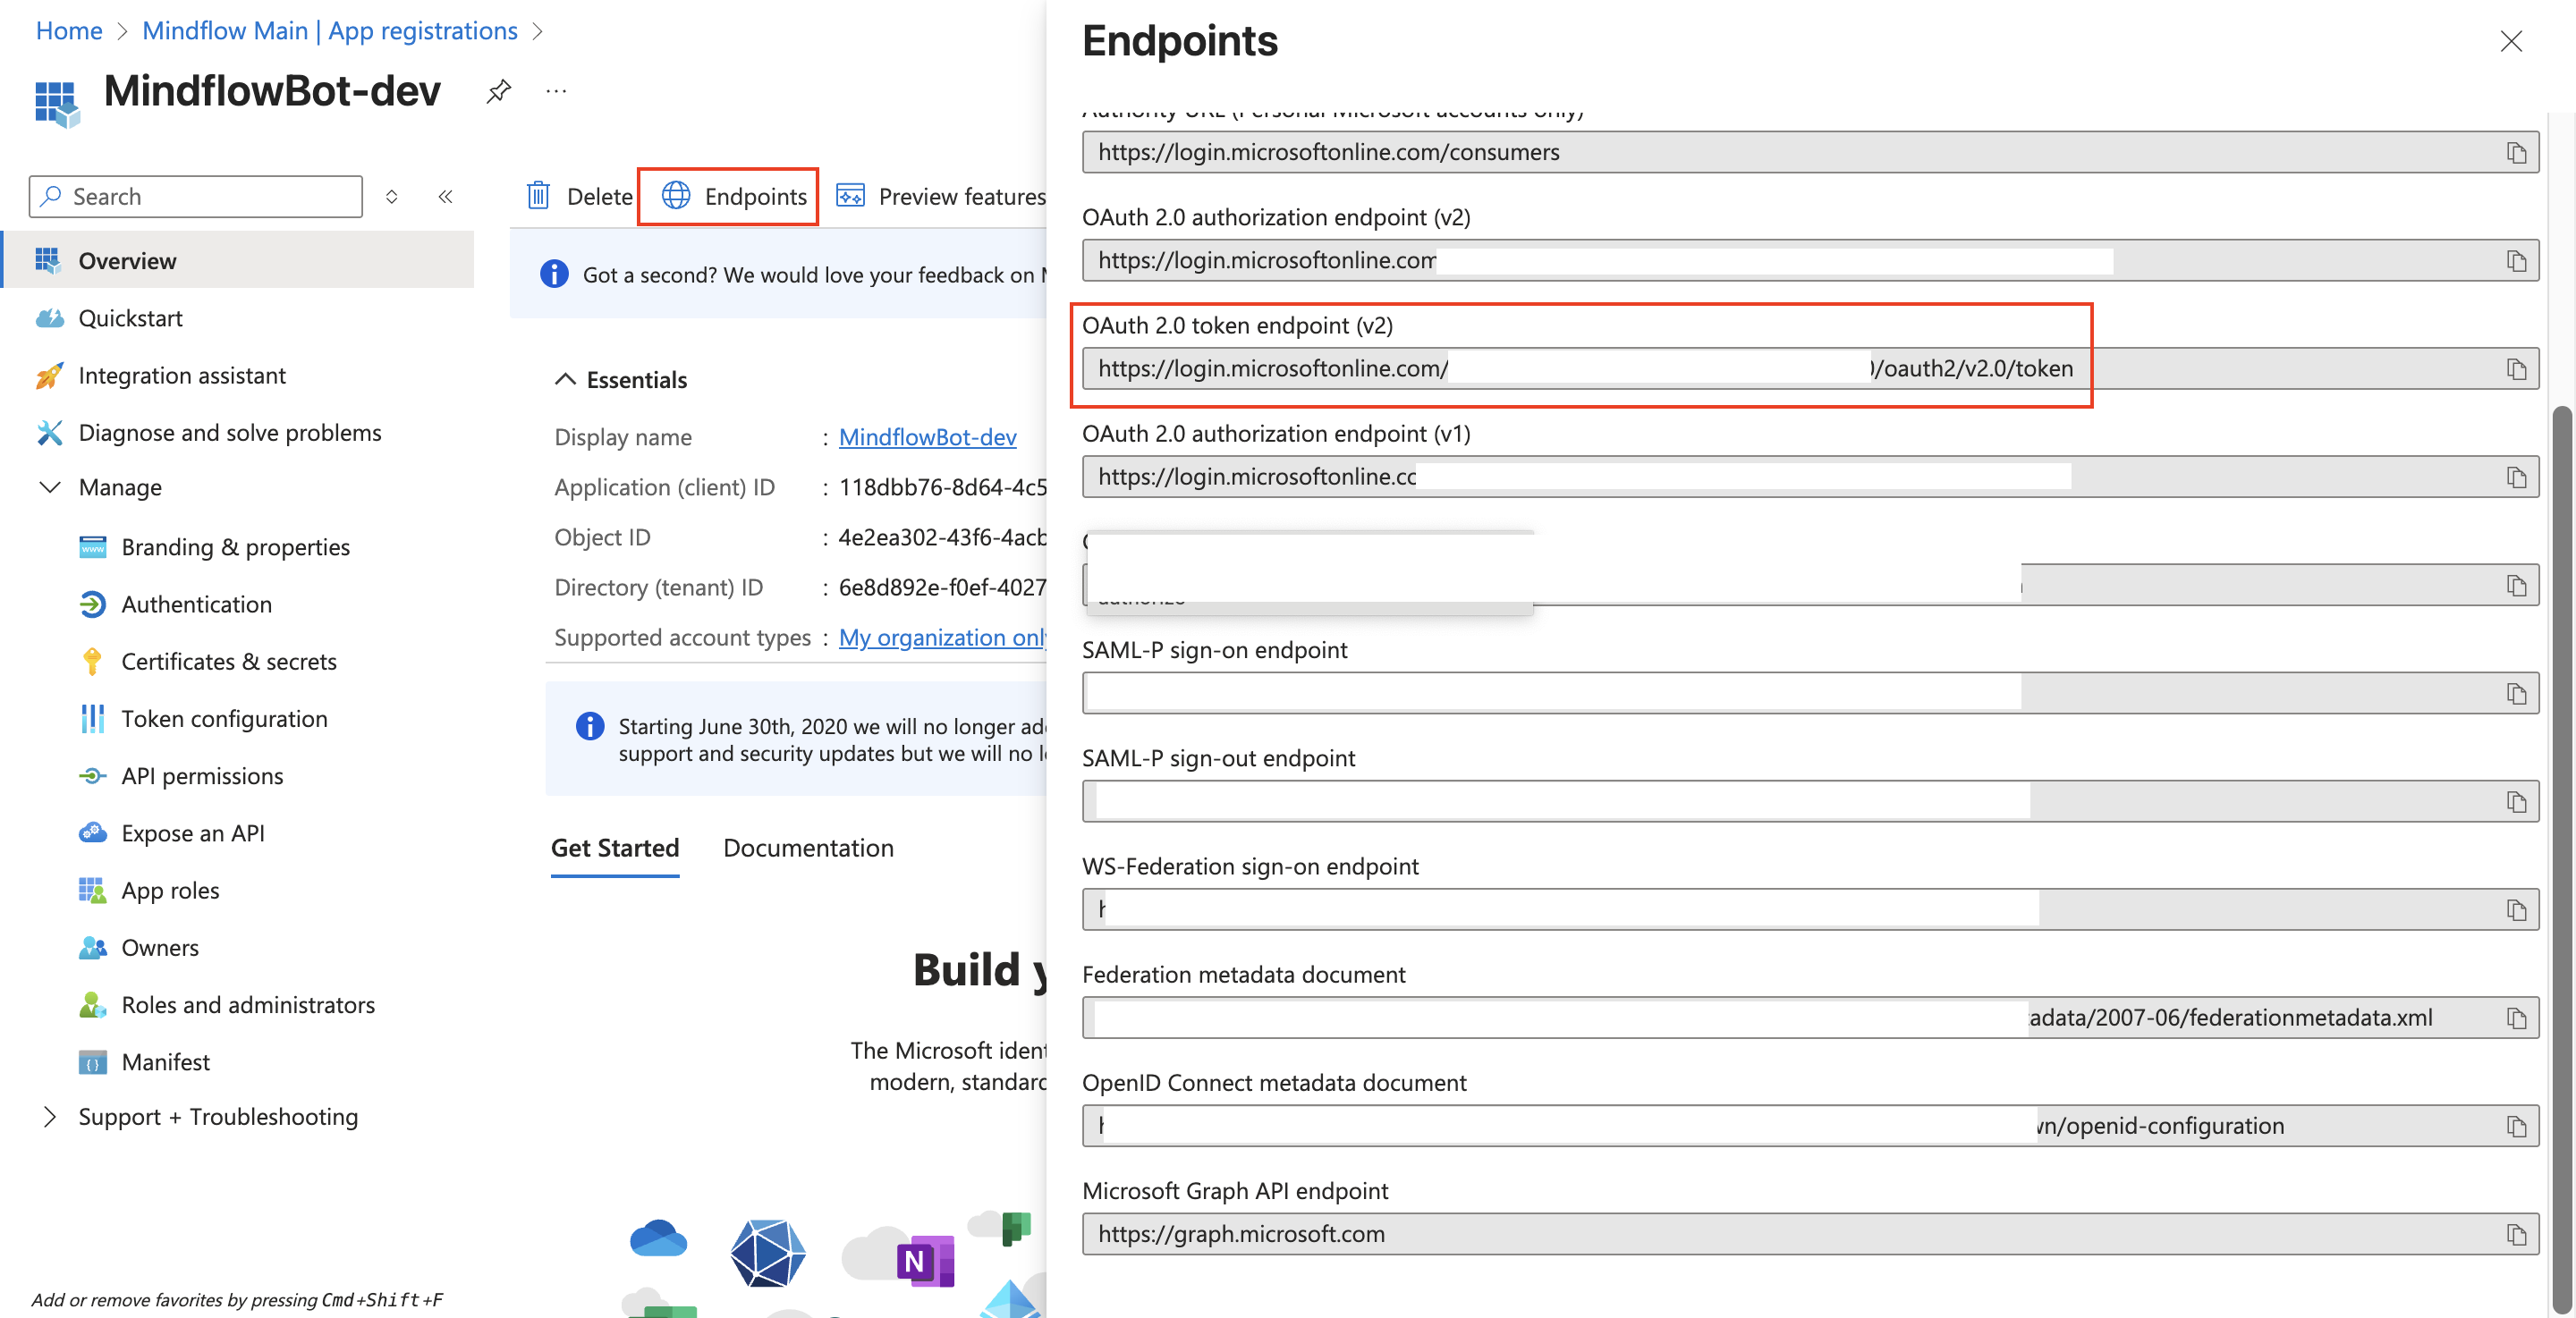
- **Messaging endpoint**: Use your webhook URL (_asynchronous endpoint, unless modified in the codebase_). - **OAuth Connection Settings**: Create a connection to your App Azure Bot. - Fill in the **Client ID** and **Client Secret** from the App Registration. - **Token Endpoint URL**: App Registration → Overview → Endpoints → select **v2 OAuth** endpoint.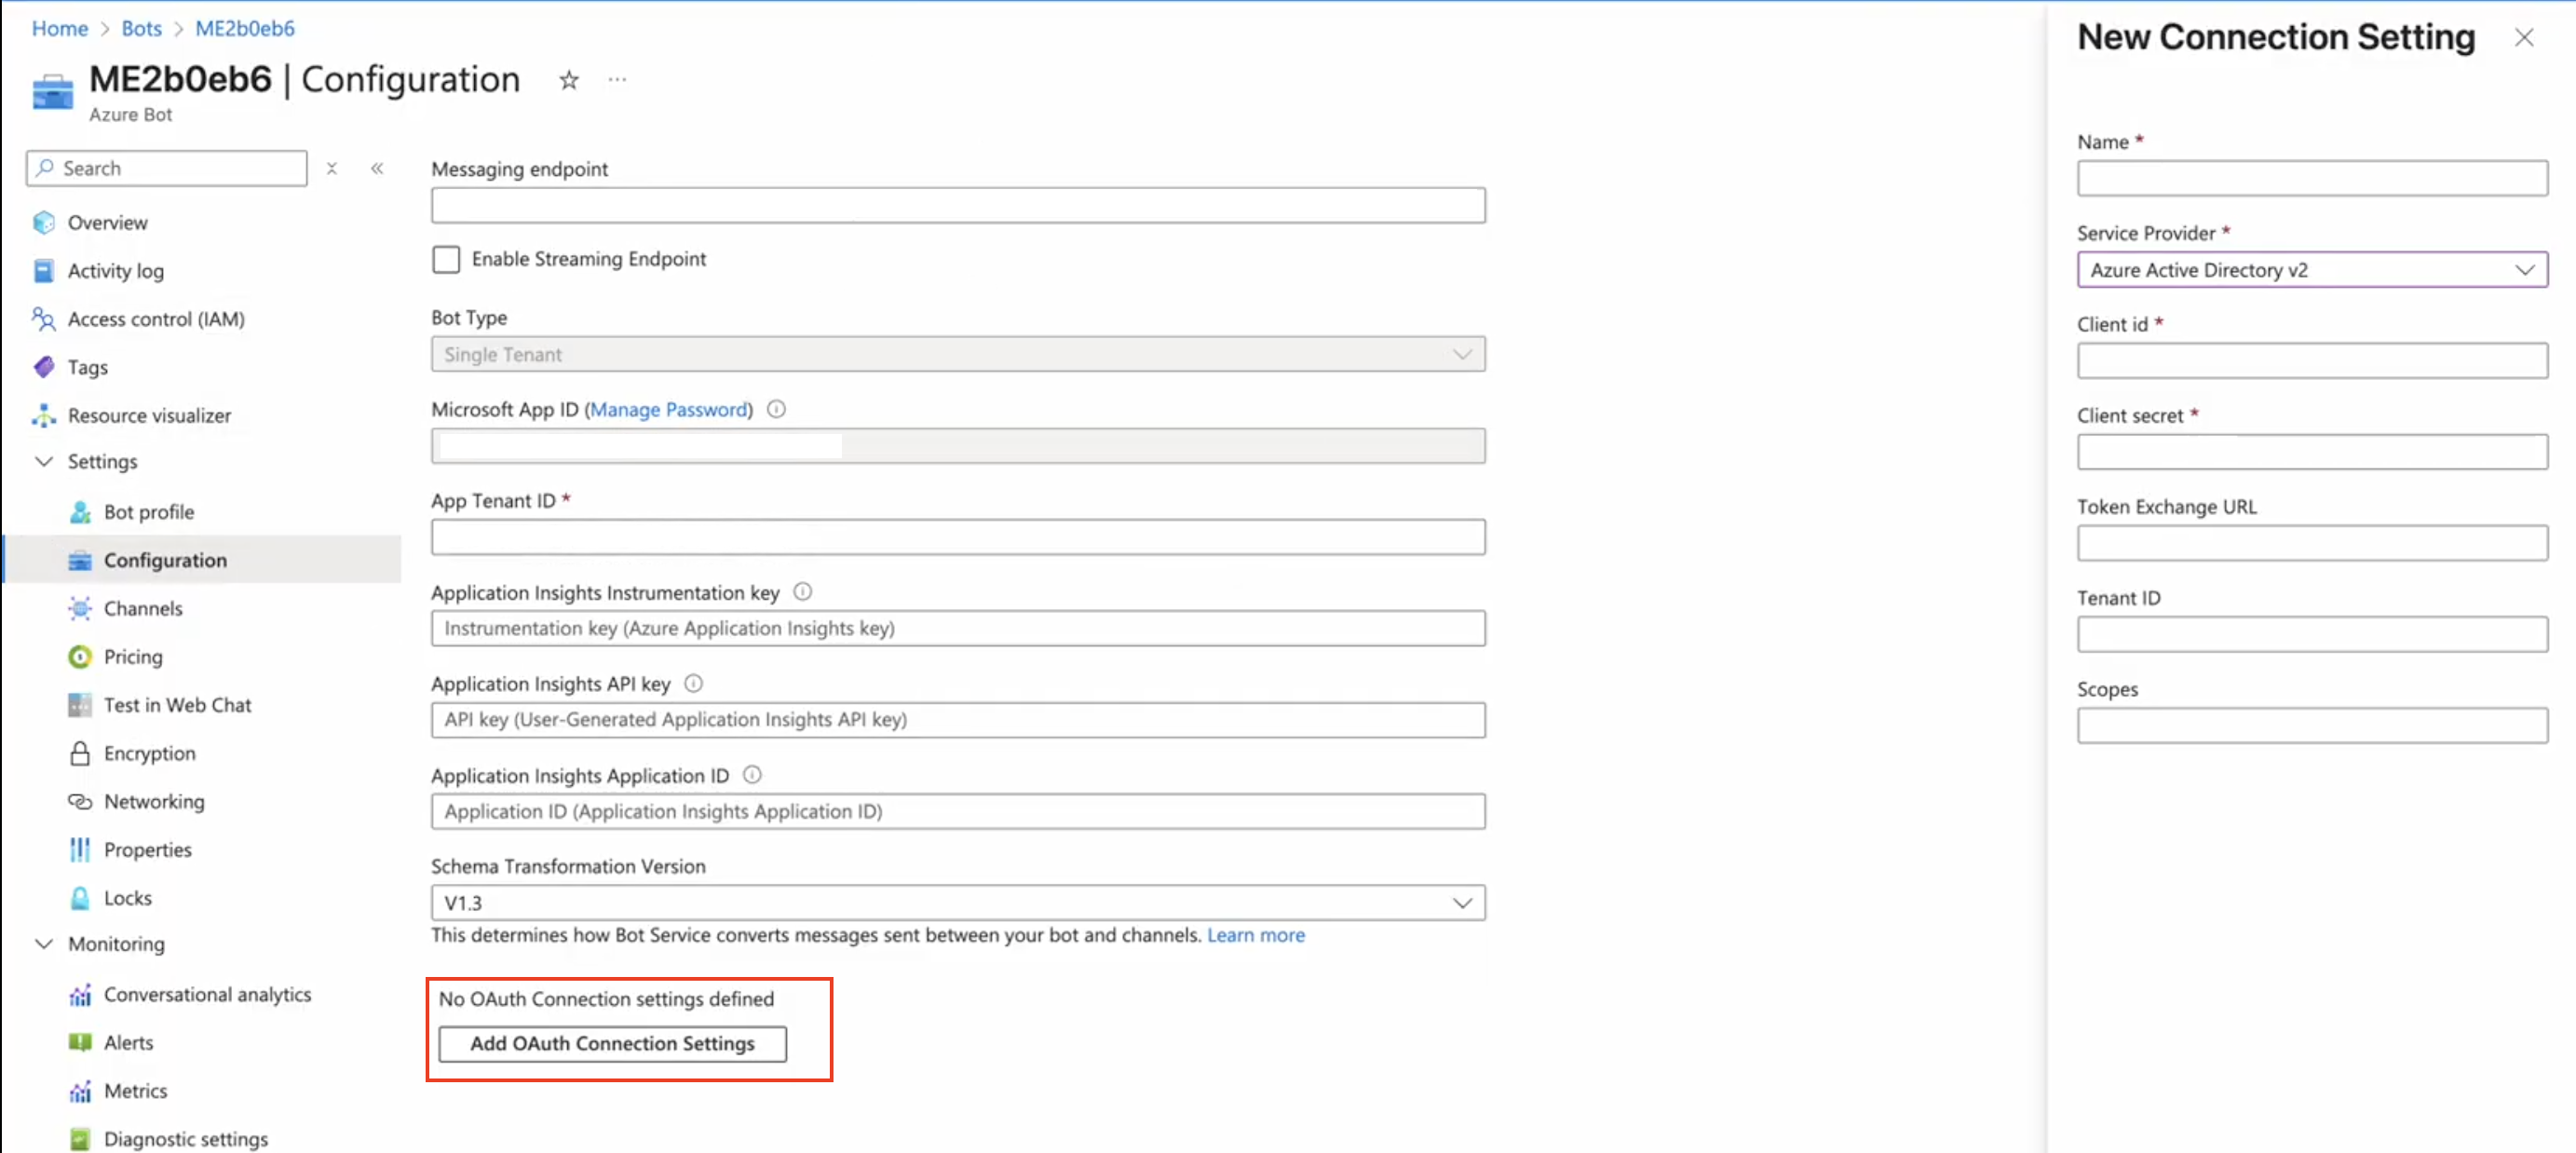
- Scope: you can either specify selective scopes separated by spaces, or use
.defaultto let the bot request all permissions granted to the Entra app.
- Scope: you can either specify selective scopes separated by spaces, or use
3.4. Grant API permissions
Section titled “3.4. Grant API permissions”-
In App Registration → API Permissions:
Add required Microsoft Graph Application Permissions (specific to your bot functionality).
Click Grant admin consent to apply the permissions.
4. Testing and troubleshooting
Section titled “4. Testing and troubleshooting”After completing deployment and configuration, it’s important to verify that your bot works as expected and to know how to handle common issues.
4.1. Testing in Microsoft Teams
Section titled “4.1. Testing in Microsoft Teams”Add the bot to Teams
Section titled “Add the bot to Teams”Sometimes, you may have to log out and log back in for Teams to properly update published bots.
-
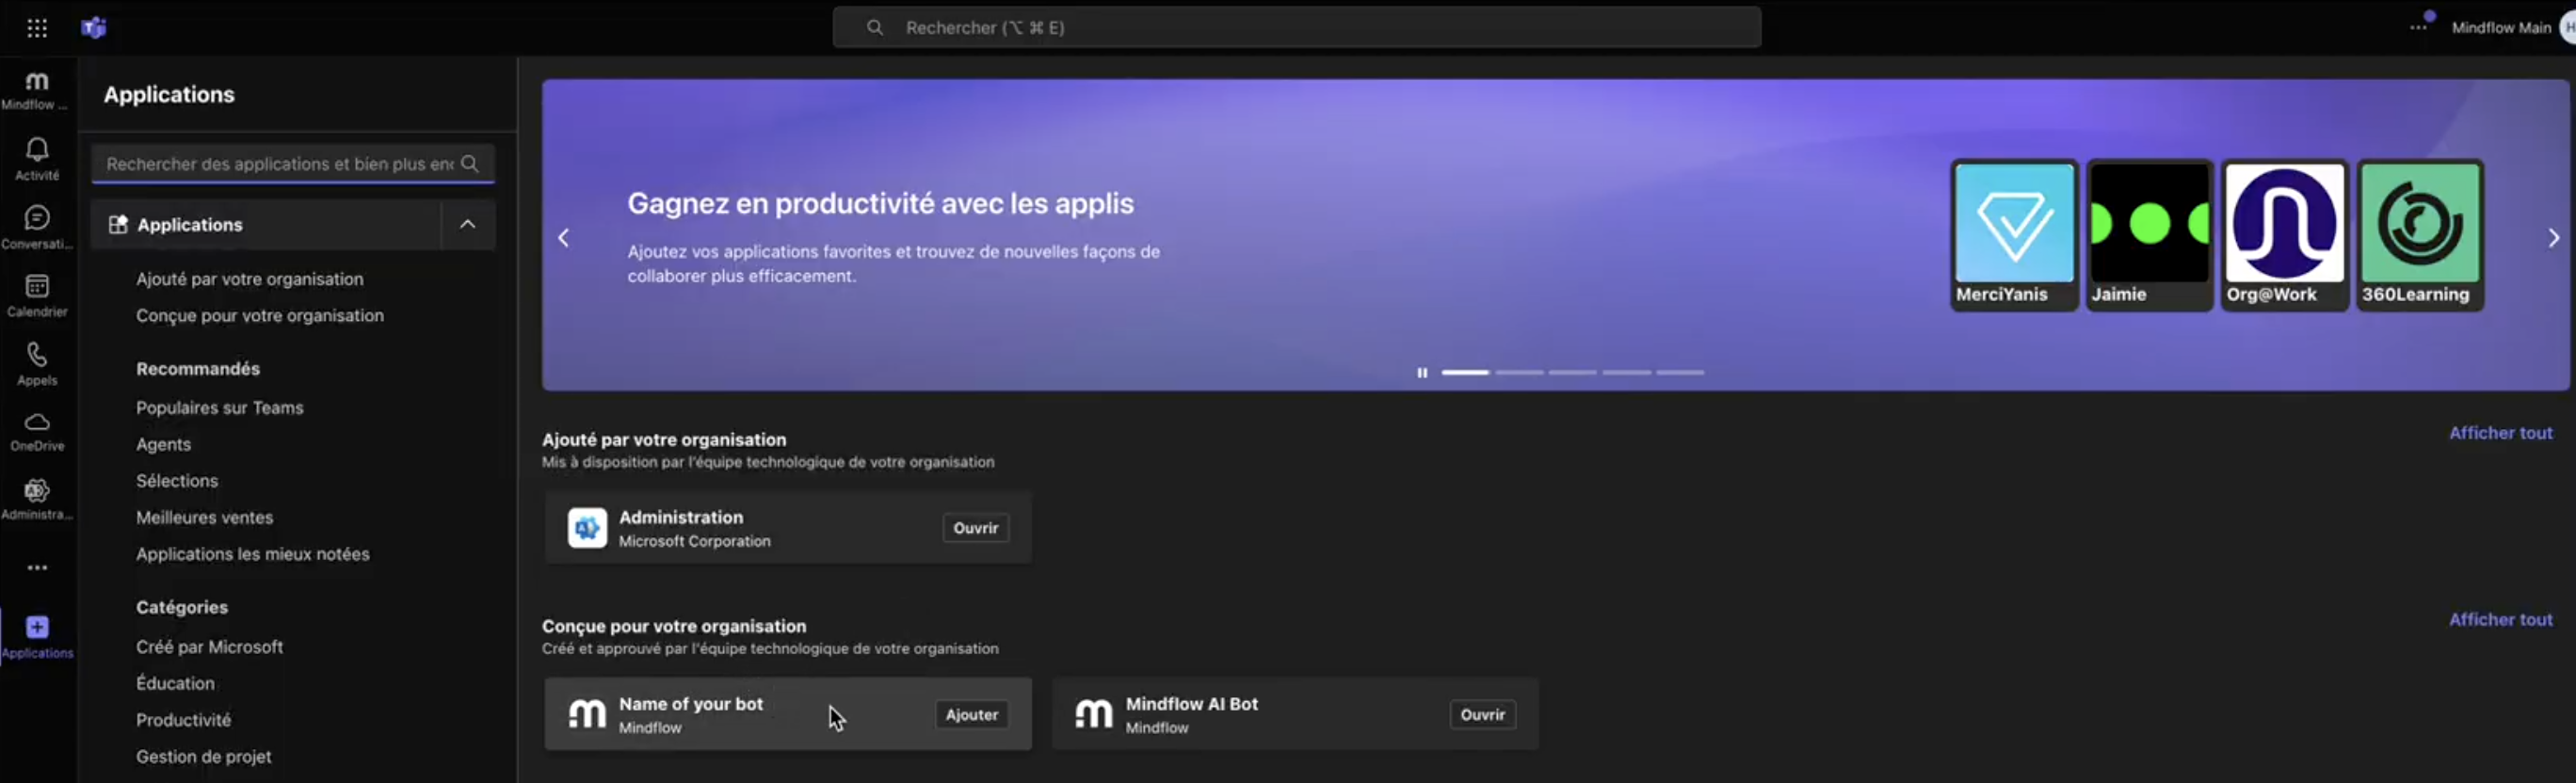
Open Teams → Applications → choose Upload for me or my teams.
-
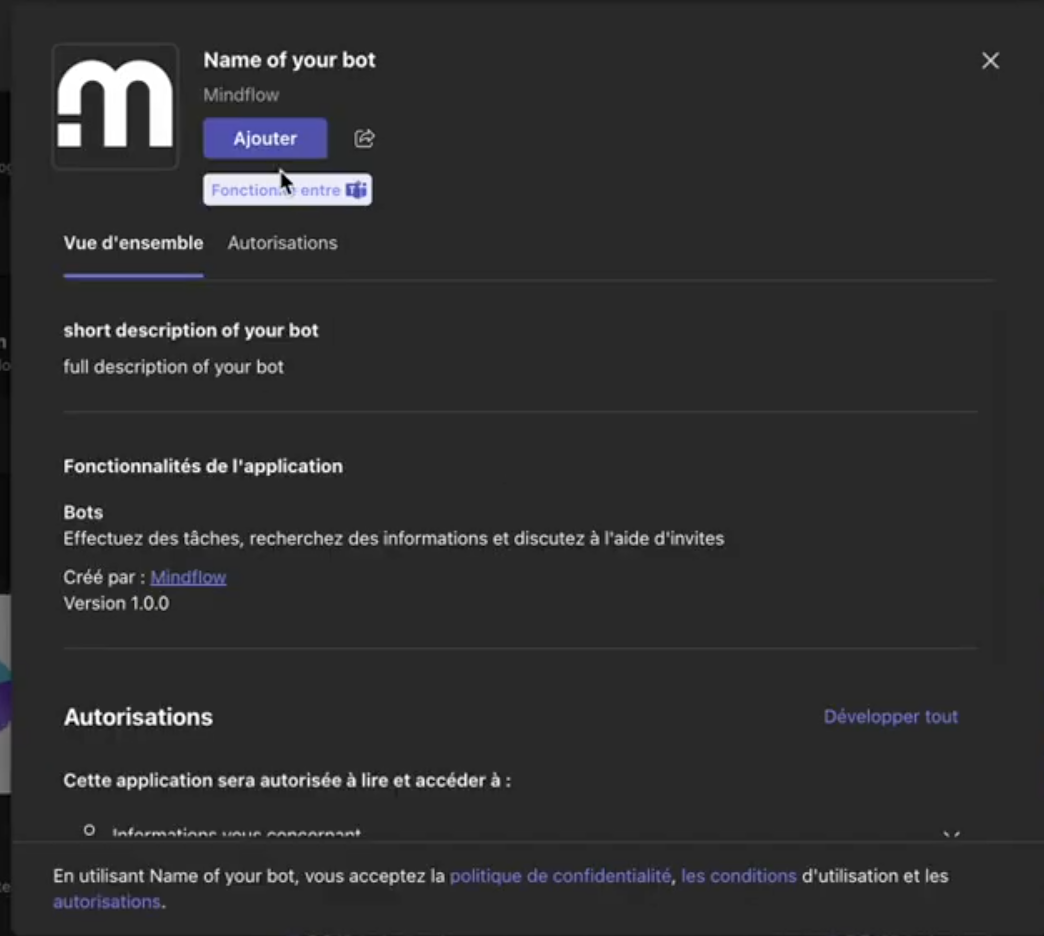
then add the bot to your environnement
5. Mindflow Integration
Section titled “5. Mindflow Integration”After your Teams bot is deployed and configured, you need to set up the corresponding workflow in Mindflow to handle incoming messages and trigger playbooks.
5.1. Create a workflow
Section titled “5.1. Create a workflow”- Open Mindflow and create a new workflow.
- This workflow will be responsible for receiving activities and messages from your Teams bot.
- Copy and paste the asynchronous webhook URL from your bot’s configuration into the workflow as the messaging endpoint.
5.2. Create a credential
Section titled “5.2. Create a credential”To allow Mindflow to authenticate with your bot via Azure Bot Service:
-
Create a new credential in Mindflow:
- Service: BOT Service Connector
- URL: Any (as new framework version doesn’t support multi-tenant, you have to leave this empty. The URL will be automatically configured at runtime)
- Application Credential: Retrieve information from your Azure App Registration
-
Configure authentication details:
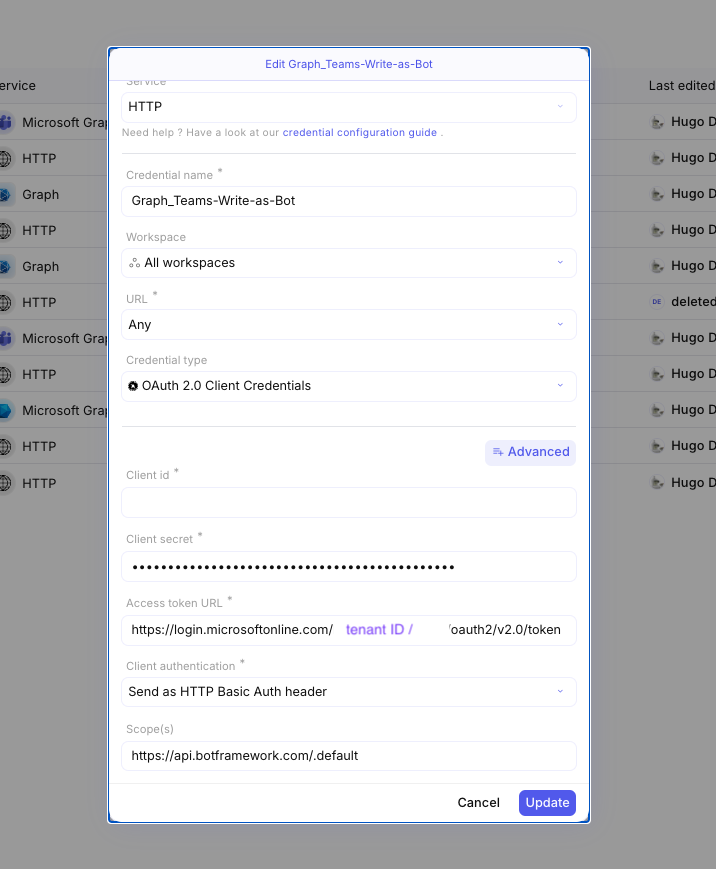
how to create a credential in Mindflow
-
Token Endpoint URL: App Registration → Overview → Endpoints → select OAuth v2 token endpoint
-
Scopes: you can either specify selective scopes separated by spaces, or use this url to let the bot request all permissions granted to the Entra app :
https://api.botframework.com/.default
-
5.3. Test the workflow
Section titled “5.3. Test the workflow”-
Open a new conversation with the bot in Teams.
-
Verify that the workflow in Mindflow runs and that a payload is received.
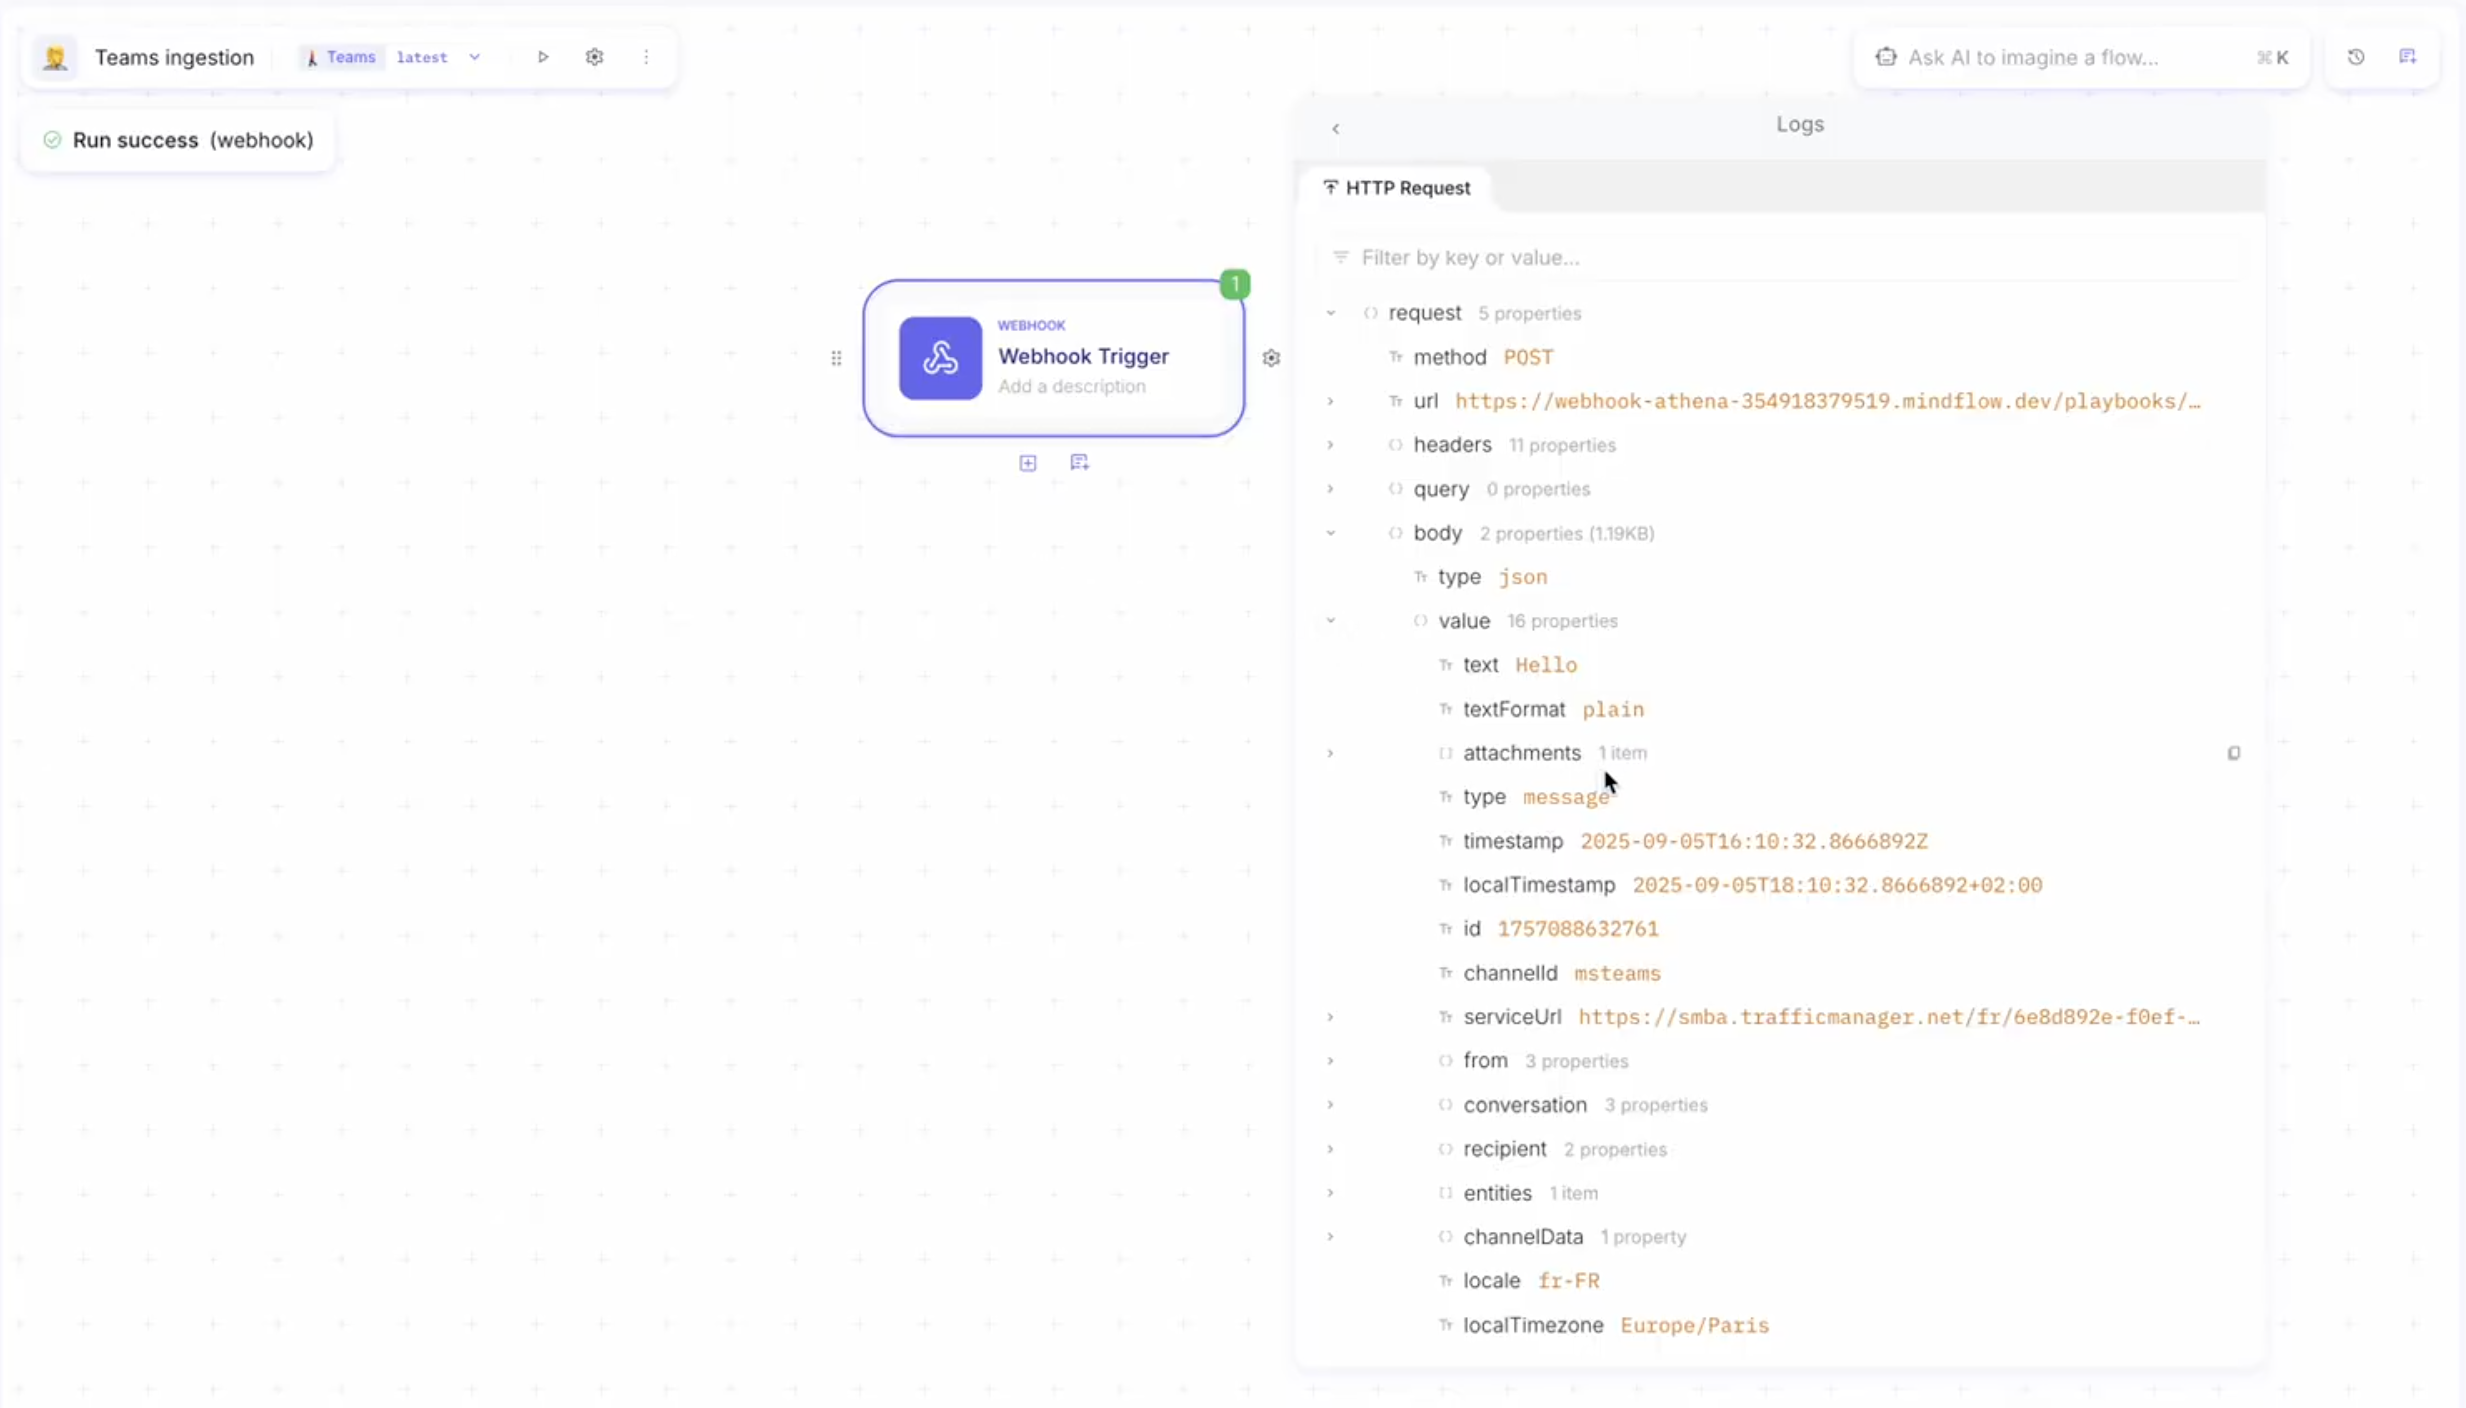
"from": { "id": "", "aadObjectId": ""}- Represents who triggered the event (the user).
- id: The internal Teams ID of the user.
- aadObjectId: Azure Active Directory ID of the user. Useful for identifying the user across Microsoft services.
"conversation": { "conversationType": "personal", "tenantId": "", "id": ""}- Represents the conversation context where the event occurred.
- conversationType:
"personal"– Indicates this is a 1:1 chat with the bot, not a group or channel. - tenantId: The tenant (organization) ID in Teams/Azure AD.
- id: Unique ID of this conversation. Needed when sending messages back.
"recipient": { "id": "", "name": "MindflowBot"}- Represents who will receive the activity.
- In this case, the bot itself:
- id: The bot’s Teams ID.
- name: Name of the bot.
"serviceUrl": "https://smba.trafficmanager.net/fr/cab00/"- The URL used to send replies or further messages to Teams.
- Every tenant may have a different service URL, so your bot should use this when posting messages back.
5.4. Configure the first response
Section titled “5.4. Configure the first response”-
In the Mindflow workflow, add an action from Bot Service Framework:
- Action type: Send to conversation
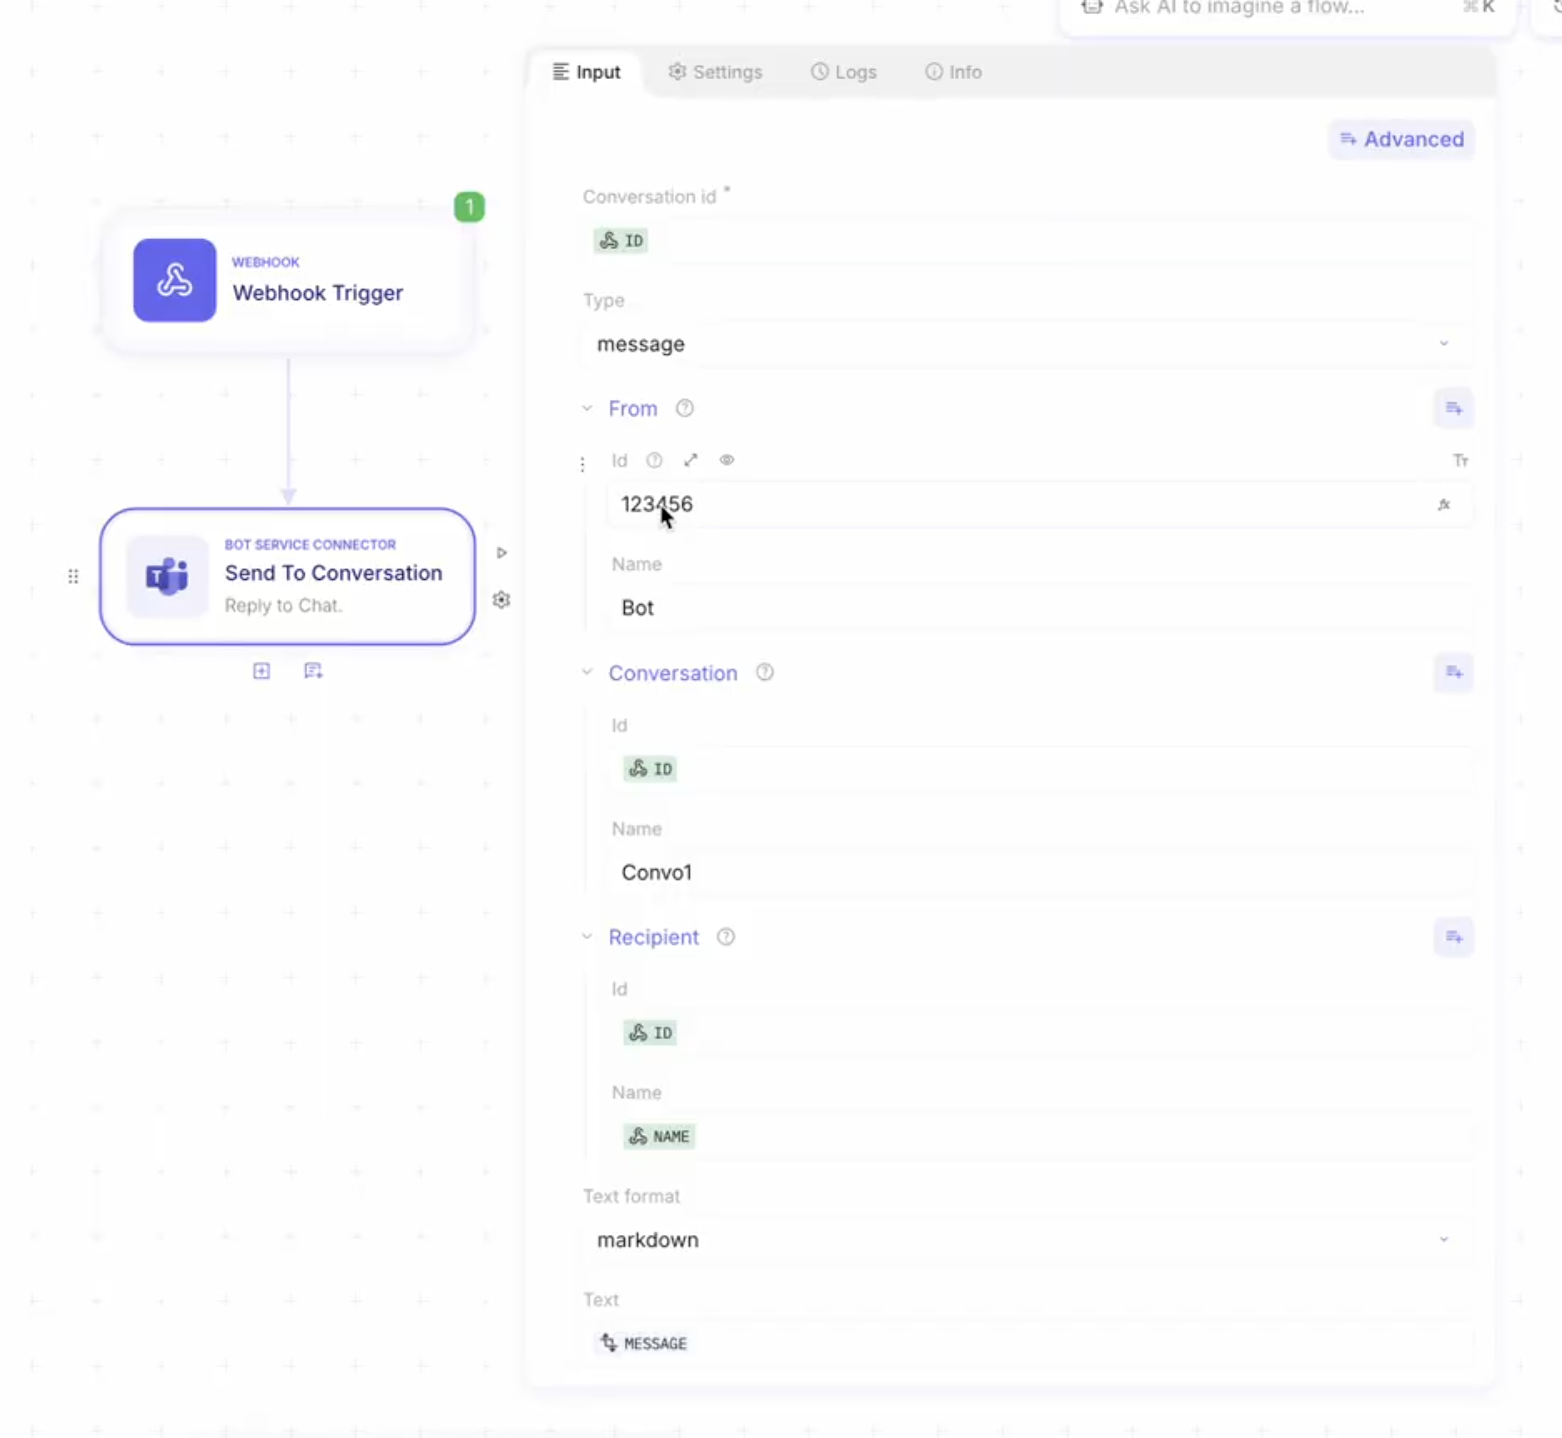
You need to use the data previously received in the webhook payload to configure the necessary parameters for responding via the API.
-
Set the parameters:
- Enter the message you want to send back in the Text field
- (Optional) Select Text format
-
In the Settings Tab, set the Address parameter to the
serviceUrlfrom the payload received from Teams. As mentioned above, this is the endpoint URL that we set toAnywhen configuring our credentials. -
Add filtering for incoming webhooks:
- With minimal configuration, the bot will push all activities, including:
messageinstallationUpdate(triggered when someone starts a chat with the bot)conversationUpdate- and others.
- You have two options to filter:
- Configure it in
teamsBot.jsto track onlymessageactivities. - Apply the filter later in Mindflow after receiving the webhook using a condition according to the type of activity.
- Configure it in
- Additionally, mention a user in a response can be handled via Bot Framework:
- I tried setting different user identifiers in the
entities[0].mentioned.idfield, including:- Teams user ID (format
"29:...") - Azure AD Object ID
- User email
- Teams user ID (format
- I tried setting different user identifiers in the
- With minimal configuration, the bot will push all activities, including:
- The exact behavior may vary depending on which ID type is used, so testing is recommended to ensure the mention works as expected.