

Adaptive cards
Introduction
Section titled “Introduction”This guide will walk you through the design and implementation of Teams adaptive cards within Mindflow to send nice notifications to users!
Prerequisites
Section titled “Prerequisites”- A Teams Credentials configured. Either a MsGraph Teams (to send messages as User) or a MsGraph Bot Service Connector (to send messages as Bot)
Useful links
Section titled “Useful links”- Microsoft provides an online builder, where you can design cards easily: Adaptive Card Builder
- Regarding icons in buttons, Micorosft also provides an Icon Library, where you can look for and find nice icons to fine-tune your notifications!
Walkthrough MsGraph Teams
Section titled “Walkthrough MsGraph Teams”Now that you have configured your MsGraph Teams credentials, how are you going to send notifications to users? Have dispatch actions, forms, interactive notifications or the likes.
Microsoft provides a framework, Adaptive cards, to meet these requirements. It’s really powerful and allows you to craft nicely designed messages.
-
Create the
Send ChatMessage in Channelstep in your workflow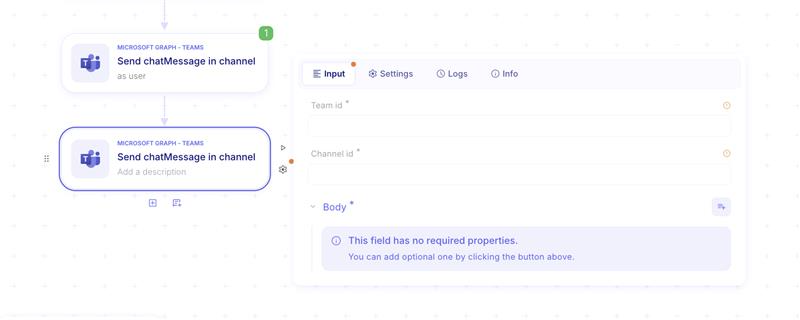
-
About appending Adaptive cards to messages: An Adaptive card needs to be sent as an attachment to the message, so:
- click Advanced, then tick **
Attachments.** - Of course, that Attachment needs to be mentioned within the body of the message, so also tick
Item body. - As you can send multiple attachments on the same message, Attachments is a list, so click Add item. Then, tick
Content,Content type, andId.
- click Advanced, then tick **
-
Now, all the mandatory fields are displayed:
- Start by:
- filling Content type with
application/vnd.microsoft.card.adaptive
- filling Content type with
- filling Id with anything (here, I’m computing a UUID with the function on Mindflow)
- Start by:
-
At this point, also configure Item body.
- Tick Content and Content type to display the fields and, within Content write
<attachment id="{uuid}"></attachment>. - You can add anything else you want, like mentions (in this instance, you also need to append Mentions within Item body). Also set Body type to
html.
- Tick Content and Content type to display the fields and, within Content write
-
Let’s focus on Content now.
-
Create your card on the Microsoft Adaptive Card Builder BUT, when copying and pasting into Mindflow mind that part:
{"$schema": "[http://adaptivecards.io/schemas/adaptive-card.json"](http://adaptivecards.io/schemas/adaptive-card.json%22),"version": "1.5"`} -
Delete it and adapt the JSON within Content.
-
For instance :
{"type": "AdaptiveCard","$schema": "http://adaptivecards.io/schemas/adaptive-card.json","version": "1.5","body": [{"type": "TextBlock","text": "Hello","wrap": true}]}
-
-
Becomes on Mindflow:
{"type": "AdaptiveCard","body": [{"type": "TextBlock","text": "Hello","wrap": true}]} -
A fully configured API request look like so:
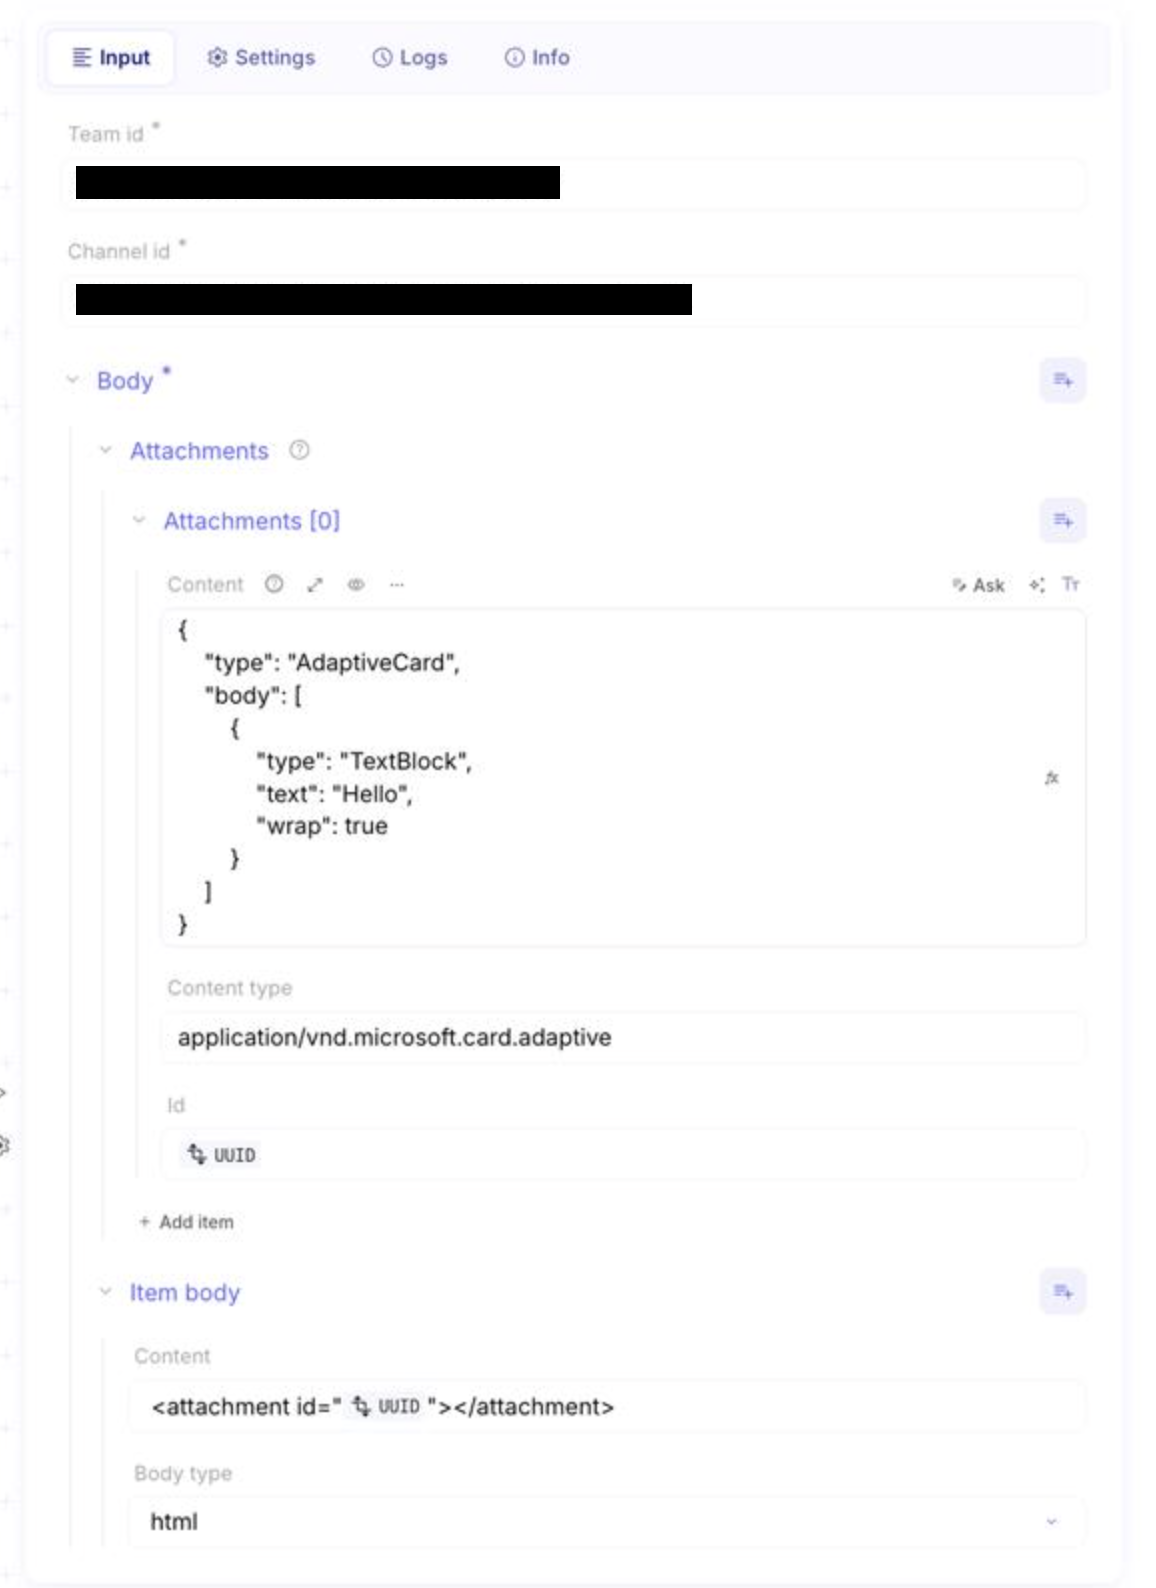
-
You can add buttons (ActionSet/Action.OpenUrl for resume URLs. Later on, with a Bot you’ll be able to use Action.Submit), with icons , images, etc.
-
For icons, look into the Library and take one’s name and update iconUrl key as such
icon:iconName -
For email phishing alerts, you could imagine something like this, with the snapshot of the website taken by UrlScan:
- Received in Teams, it will look like so:
[image](https://as-prod.asyncgw.teams.microsoft.com/v1/objects/0-ea-d10-e47c09829a2d8be50d93676670a88661/views/imgo)- In Mindflow, here how the code will look like:
```json{ "type": "AdaptiveCard", "body": [ { "type": "TextBlock", "size": "Medium", "weight": "Bolder", "text": "Title" }, { "type": "TextBlock", "text": "Date", "wrap": true }, { "type": "TextBlock", "text": "Received by:\n\nIOCs\n\n- Sender:\n- Subject:\n- URL: https://pop[.]chezsabuniversdigital[.]xyz/\n\nSee URL preview below", "wrap": true }, { "type": "Image", "url": "https://urlscan.io/screenshots/019b0f6a-248b-74de-ae8c-2b5ee723acc6.png" }, { "type": "ActionSet", "actions": [ { "type": "Action.OpenUrl", "title": "Ok", "iconUrl": "icon:ShieldCheckmark", "tooltip": "False positive.", "style": "positive", "url": "resumeUrlHere+query=ok" }, { "type": "Action.OpenUrl", "title": "Delete", "mode": "secondary", "iconUrl": "icon:BinRecycleFull", "url": "resumeUrlHere+query=delete" }, { "type": "Action.OpenUrl", "title": "Ban Sender", "style": "destructive", "iconUrl": "icon:BugProhibited", "tooltip": "Submit URL to MDO", "url": "resumeUrlHere+query=ban" } ] } ]}```textWalkthrough MsGraph Bot Service Connector
Section titled “Walkthrough MsGraph Bot Service Connector”Once you have deployed a Bot in Teams (see Creating and configuring a Bot in Teams) you are now at the stage to think how you’re going to notify, interact with users!
Of course, like with MsGraph Teams, you can design your messages with Adaptive cards.
-
Design your card using Microsoft’s Adaptive Card Builder
-
Activate the Bot Service Connector API in Mindflow (within Teams)
-
On the flow canevas, create a
Send to Conversationstep. -
The configuration is almost the same as with MsGraph Teams. However, in this instance you only need to append an attachment and define the Type. So click Advanced and enable
TypeandAttachments. -
From there, I recommend that on the right side of Attachments, to click the three dots menu and click
Edit as JSON. It will turn the whole object as JSON and it’s way easier to configure!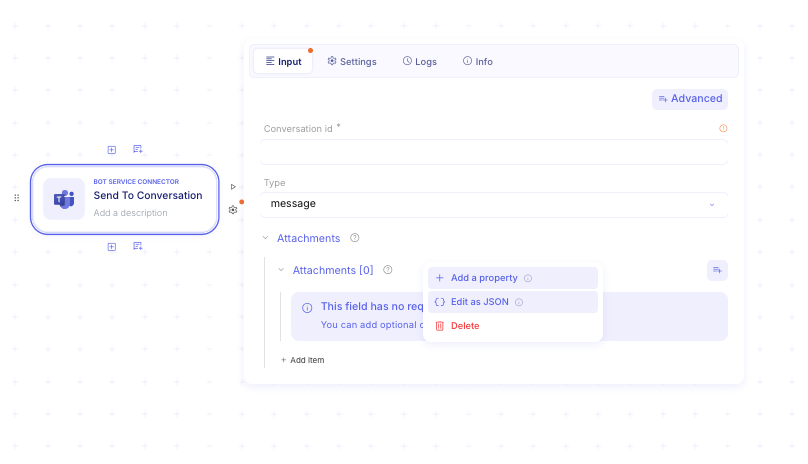
-
Configure the input with your adaptive card by including
contentTypeandcontentinside.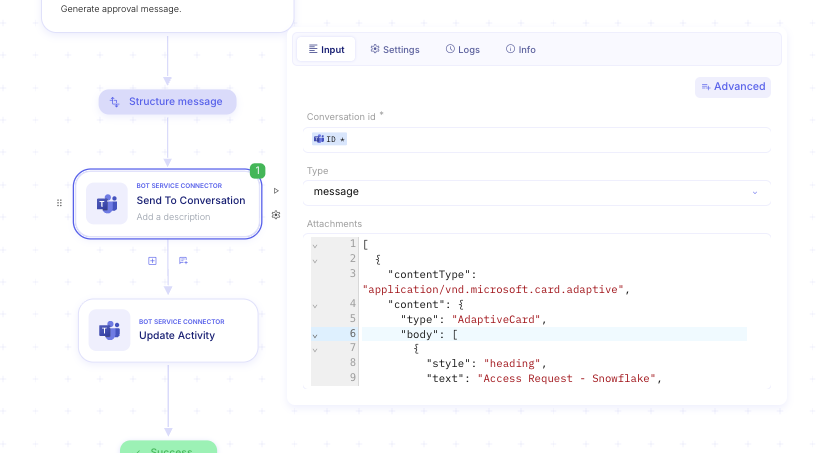
-
Here’s a payload example
[{"contentType": "application/vnd.microsoft.card.adaptive","content": {"type": "AdaptiveCard","body": [{"style": "heading","text": "Access Request - Snowflake","type": "TextBlock","wrap": true},{"type": "TextBlock","wrap": true,"text": "Hey Hugo!"},{"type": "TextBlock","wrap": true,"text": "I have received your access request to Snowflake. Let's proceed and fill out this questionnaire so I can provision your access!"},{"isRequired": true,"errorMessage": "You must pick an environment!","placeholder": "Pick one","label": "Environment","id": "1","type": "Input.ChoiceSet","choices": [{"title": "Prod1","value": "snowflake.environment:Prod1"},{"title": "UIT","value": "snowflake.environment:UIT"},{"title": "Prod2","value": "snowflake.environment:Prod2"}]},{"isRequired": true,"errorMessage": "You must pick a dataset!","placeholder": "Pick one","label": "Dataset","id": "2","type": "Input.ChoiceSet","choices": [{"title": "clients","value": "snowflake.dataset:clients"},{"title": "internal","value": "snowflake.dataset:internal"},{"title": "partners","value": "snowflake.dataset:partners"}]},{"isRequired": true,"errorMessage": "You must pick a role!","placeholder": "Pick one","label": "Role","id": "3","type": "Input.ChoiceSet","choices": [{"title": "Admin","value": "snowflake.role:Admin.approver:Hugo David"},{"title": "Readonly","value": "snowflake.role:Readonly.approver:Hugo David"},{"title": "Readwrite","value": "snowflake.role:Readwrite.approver:Hugo David"}]},{"type": "TextBlock","wrap": true,"text": "Note: Approval will be required from Hugo David."},{"type": "ActionSet","actions": [{"style": "positive","iconUrl": "icon:CheckmarkSquare","type": "Action.Submit","title": "Submit","associatedInputs": "auto"}]}]}}] -
And how it looks on Teams
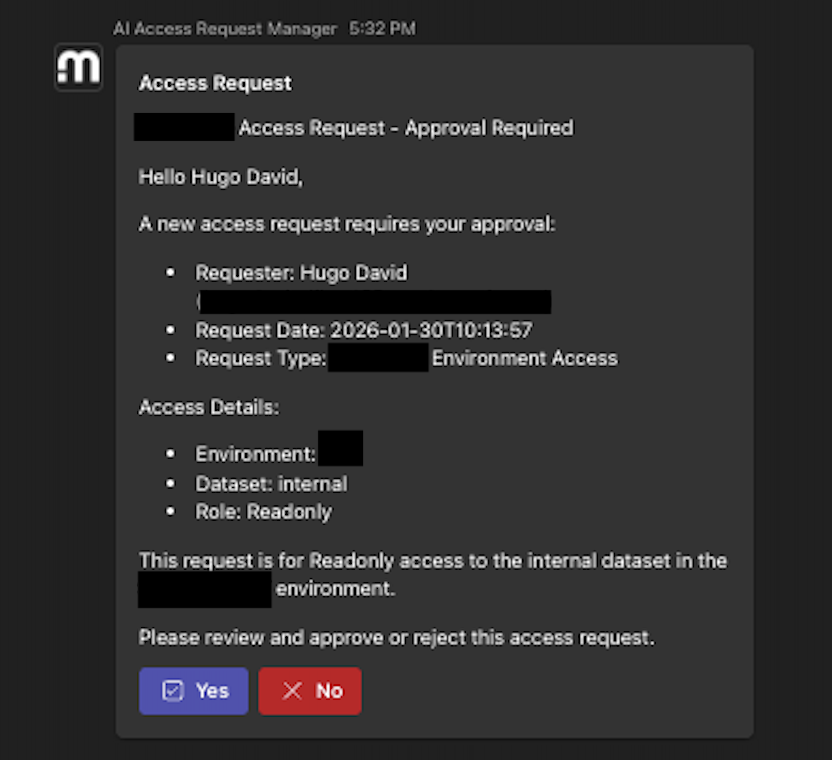
-
Also, don’t forget that you can use AI··Tasks to handle the generation of Adaptive cards for you!
-
As an example, you can generate interactive forms:
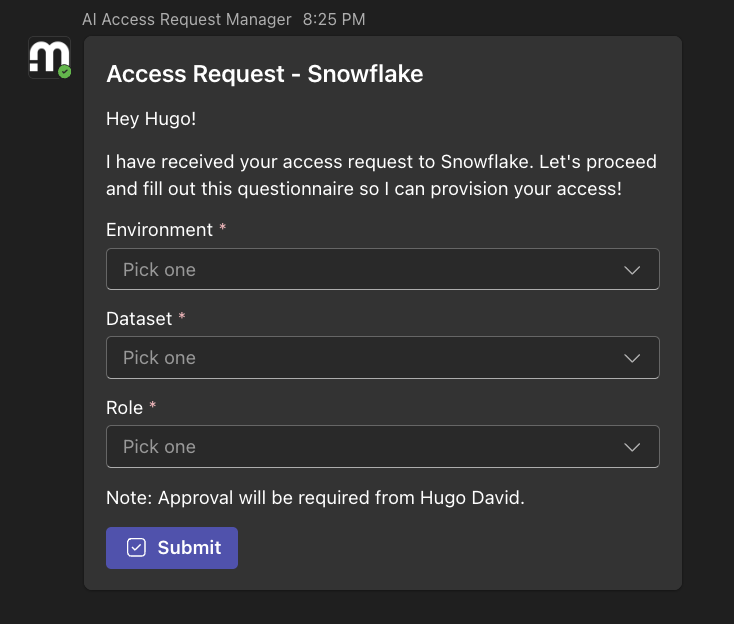
-
Here’s how the JSON looks:
{"type": "message","attachments": [{"contentType": "application/vnd.microsoft.card.adaptive","content": {"type": "AdaptiveCard","body": [{"style": "heading","text": "Access Request - Snowflake","type": "TextBlock","wrap": true},{ "type": "TextBlock", "wrap": true, "text": "Hey Hugo!" },{"type": "TextBlock","wrap": true,"text": "I have received your access request to Snowflake. Let's proceed and fill out this questionnaire so I can provision your access!"},{"isRequired": true,"errorMessage": "You must pick an environment!","placeholder": "Pick one","label": "Environment","id": "1","type": "Input.ChoiceSet","choices": [{ "title": "Prod1", "value": "snowflake.environment:Prod1" },{ "title": "UIT", "value": "snowflake.environment:UIT" },{ "title": "Prod2", "value": "snowflake.environment:Prod2" }]},{"isRequired": true,"errorMessage": "You must pick a dataset!","placeholder": "Pick one","label": "Dataset","id": "2","type": "Input.ChoiceSet","choices": [{ "title": "clients", "value": "snowflake.dataset:clients" },{ "title": "internal", "value": "snowflake.dataset:internal" },{ "title": "partners", "value": "snowflake.dataset:partners" }]},{"isRequired": true,"errorMessage": "You must pick a role!","placeholder": "Pick one","label": "Role","id": "3","type": "Input.ChoiceSet","choices": [{"title": "Admin","value": "snowflake.role:Admin.approver:Hugo David"},{"title": "Readonly","value": "snowflake.role:Readonly.approver:Hugo David"},{"title": "Readwrite","value": "snowflake.role:Readwrite.approver:Hugo David"}]},{"type": "TextBlock","wrap": true,"text": "Note: Approval will be required from Hugo David."},{"type": "ActionSet","actions": [{"style": "positive","iconUrl": "icon:CheckmarkSquare","type": "Action.Submit","title": "Submit","associatedInputs": "auto"}]}],"$schema": "http://adaptivecards.io/schemas/adaptive-card.json","version": "1.4"}}]}